
(sometimes you need to learn something new and adapt)
Hello everyone!
Today I want to deviate a little from the classical “low-level engineering” post (another one will arrive soon 😃) and describe a project by which I started to work more than one year ago. Randomly enough, two Chinese companies already copied it, but I will not say their names here because is useless.
At work, I always need to deal with test machines to debug and experiment with kernel code that I write and requires new hardware (HLAT and LASS being the latest). When I travel back to my home city in Italy, I am at 9 hour behind the Redmond time zone, and often it happen that my code does not work as expected, or the machine hangs without being able to access the debugger anymore (something similar happened too, like the need to access / modify some settings in the debugger). So what to do?
Back in the days I was waiting the “raising” of the American morning (which starts at 6PM in Italy) to ask some colleague to restore my test machine, but this was not working anymore for a lot of issues that the reader can imagine… 😔
So, after some researches in Internet, I was not happy about the cost, the performance and the characteristics of the multitude of KVMs already available on market. I knew that I could have done something better, so I decided to study and deal with C#, Direct Show, Media Foundation and high level APIs that Windows provides to manage Video/audio and multimedia processing. Note that I never really programmed anything serious in the Multi-media world, or either in the high level C# language (something that happened last time in the high school, and I am 38 years old now 😗), but… after some trivial newbie mistakes, I had a lot of fun with these technologies (I found C# and .Net in general pretty great).
Before begin let’s say that for this post, all the material has been published in my GitHub account, under the MiniKvm_public repository.
How let’s start with the basics: a KVM stands for Keyboard, Video and Mouse. For my idea, I needed all of those, but also the ability to control the power supplied to the target machine. Thus, I decided to divide the problem and start with just the power: I wanted to be able to switch on and off (or power cycle) a target machine….
KVM Power interface
Controlling the power interface of a target machine was actually pretty easy. I knew some basics of electronics and I knew also that transistors (BJTs and MOSFETs) can be easily used to pilot the “Reset” (and others) pin of the motherboard of any workstation. Cool, but what about situations in which you can not control any MB PINs (for laptops or customized devices that do not exposes power PINs)?
Simple, similar to Transistors, another common component heavily used in electronics is called Relay. A relay is a electrically operated switches that open and close the circuits by receiving electrical signals from outside sources. It is similar to a transistor but it can operate on way higher currents (like 120 and 240 V, the same current as the standard appliances work in our day-to-day life).
For power, I’ve learnt the basis on these electronic components and I wired them up using a cheap Arduino controller, which is piloted by a USB-to-Serial connector, allowing me to “talk” to the relays and transistors via a serial port. Initially I had fun programming the Arduino controller and building the base electronic board for controlling the relay and transistors. I attached two relays at the 120/240 V power line, making me able to switch on and off two workstations from their main power supply. I then added two transistors, able to briefly “close” the circuit for the “Reset” and “Power” switch of another two test machines.
You can check the code for the Arduino controller here: https://github.com/AaLl86/MiniKvm_public/blob/main/Arduino/RelaySensor_board.ino. Furthermore, you can find more information on transistors and relays here, here and here. Since assembling something similar is trivial, I will not continue with more details on the “Power” part… let’s switch to the “Video” part…
High speed video input
A basic prerequisite for my KVM was that it would have been able to pilot at least a Full HD resolution (1920×1080) at high speed, minimum 30 FPS (but ideally 60. I ended up with this prerequisite after trying to use some commercial KVMs used to manage test systems in our lab… they literally suck… and the excuse was: why do you need high resolution or high speed? After the bootstrap you can use RDP. This, in my opinion, is not always true and is not a good excuse).
Thus, armed with some patience, I searched online something like “Video capture” and I found that a lot of stores already commercialize products like the one I was looking for, especially for video game streaming (XD). A video capture card like this or this are able to accept as input a 4K signal and capture it at a good resolution of Full HD (60 FPS) or 2K (30 FPS. Note that this is the output resolution). They are pretty cheap and perfect for the goal (only problem is that they only works with HDMI interface for some reason. At the time of this writing, no affordable Displayport capture cards exist, I have no idea why).
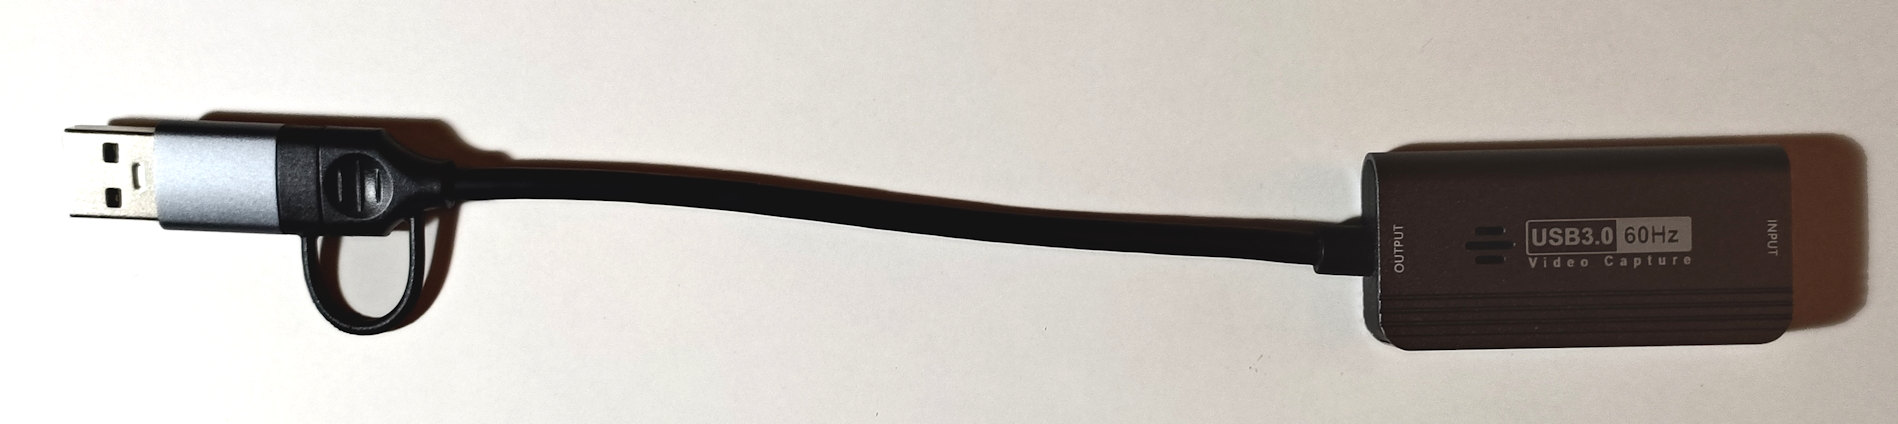
So great, I had the device, but now how to deal with it? I needed an API to access it and to manage the frames it captures. Luckily enough, after some testing and research I found that all these kinds of device uses the same “Camera” Pnp device setup class as the webcam included in your laptop. Great news… this means that the same programming interfaces used by the Camera App (included in Windows 11) could be used for my KVM. I bought one of the video capture card from Amazon and I tested it, and yes, my camera App was able to show the screen output (BIOS included) from another workstation. Great, would have been better only if I knew how to capture video and audio from a Camera…
Even here, a quick look at MSDN helped a lot (and also a look at the myriad of open-source camera applications available on the Web helped too). Since the code to interface with these devices is pretty messy, here is a recap on the two main technologies available in Windows:
- DirectShow – The classical interface built in the Windows 2k era. Entirely COM based, pretty well documented in MSDN and obsolete. I did some experiment with a MFC application and I was able to enumerate all my devices, their supported resolution and acquire some video input in around 6 hours
- Media Foundation Platform (MFP) – The next generation multimedia platform for Windows. Still COM based, but exposes a brand-new API set (the majority exposed in the “mfapi.h” header) which I found decently to use. Fully documented in MSDN. I did some experiments with MFP with another MFC application and I succeeded in capturing the video stream from the video capture card.
There was a big problem that I needed to solve though. The acquisition of Full HD uncompressed signal require a lot of bandwidth, in terms of CPU power. Thus, showing the original “untouched” captured signal on the screen was pretty trivial, but when the window was resized the problem started to arise. I tried to deal with the C++ IMFSinkWriter class, but I found it pretty cumbersome to use in my entire project. Plus designing a modern GUI solely with Win32 and MFC was an hard and time-consuming job for a free-time project like this. … So it was time to move to C# and see if some available library could have been able to translate Media Foundation or DirectShow in a handy .Net class.
I do not want to discuss all the implementation details here, but just to give to the reader an overview. C# is great, fast and effective, and I found various pretty easy-to-use libraries able to acquire video frames from a camera and display in a Windows Forms Control (like AForgeNet for example). All of these libraries were great, but they were still suffering of the same issue when the video was not displayed in its original resolution: performance: each frame was resized with GdiPlus, which is great, but not designed to deal with this huge quantity of data.
A uncompressed Full HD frame size is around 8 MB. Thus, my new algorithm should have been able to resize in 1 second around 474MB of data (8MB multiplied by 60 FPS). Something that a single core of my little host machine could not stand (a dual core Celeron 630SE TigerLake-U based. One of the goal of this project was to be able to run and scale well also on mini-PC and economic systems) . So, I scratched my head to try to find a solution, since GdiPlus was not able to resize all frames fast enough to condense more than 25 FPS.
I need to admit that I spent multiple nights trying to solve the issue… I tried two main strategies:
- Process each frame with multiple cores. Assuming that in 1 seconds the KVM was receiving and processing 30 or 60 frames, with a lot of patience (and correct synchronization) I could have each core resizing individual frames, and then combine back the result in a new contiguous video stream.
- Compress the individual frames or the video signal using codec like MP4, HEVC and so on…
Solution #2 was too difficult for me to achieve, since I have no idea how a video compression algorithm really work, and learning all the details was really too much (Again, I am not a video or multimedia expert). In one week I kind implemented #1 (with a lot of issues, since doing the frame synchronization correctly is far away for being easy), and the results were ok, but still not enough. I was able to touch around 48 FPS by saturating all the two cores of my slow Celeron. I was still curious to understand how commercial video applications scale well also in slow systems.
I was almost giving up when I discovered Emgu Cv. This library is great, and is the only one that I found that does not rely on GdiPlus to resize bitmaps. And guess what? The implemented resize algorithm is fully parallel, meaning that is automatically able to scale to multiple cores. Thus, I deleted all my code and performed the resize with a simple:
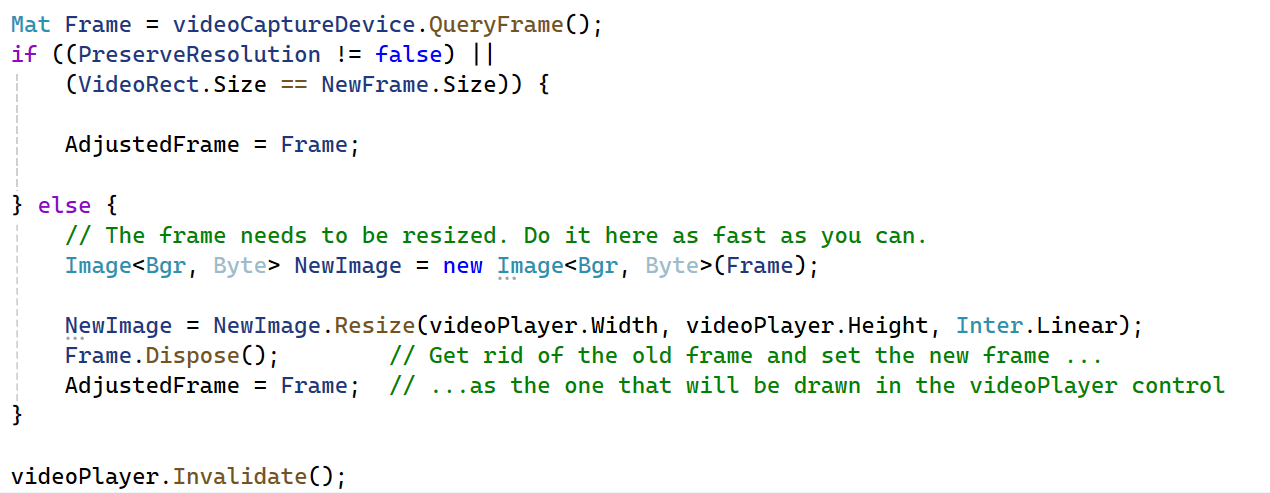
Boom! 60 FPS with 2 Celeron cores at around 90% of their utilization – Mission accomplished (faster than the default Camera App of Windows. Thanks Emgu CV, great job, better than my naive implementation)! Note that I skipped all the issues that .Net brings when processing high density frames and somehow you screwed up with memory allocation / freeing (thanks Garbage collector!). It has lead my little host machine to leak 4 to 8 GB of commit on my MiniKvm process in less than 10 seconds 😂.
High speed HID over USB
Now the hardest part… how to send HID (Human Interface Devices) command via a USB cable? One obvious solution was to design a brand-new USB miniport driver that somehow accepts HID commands coming from one side and transfers it to the other side. But this was a little too complicated since it required messing up with the USB driver stack of the OS (plus, I needed to study all the USB HID specifications, published here, and not immediately trivial). So, I searched on Internet and I stumbled upon a solution that was turning a Raspberry PI into a USB keyboard (here), plus bunch of other home-made ones (see here). None of them worked, since they require “special devices” which were not compatible with my design (I wanted to control multiple targets from a single host).
While I was starting to study the specs for the worst solution ever (writing a new USB miniport driver), I discovered on AliExpress the perfect controller, called CH9329 😊. This chip is basically a Serial to HID converter, is extremely chip and does its job in a very great way. There was only a problem: while the chip datasheet was public and easily downloadable (see here), its “Communication Protocol” was not, making almost impossible to use all the features of the chip. Luckily enough, after multiple hours of research (using also peer-to-peer networks), I was able to find the Chinese version of the protocol specifications. I do not speak Chinese, nor I am able to interpret it, so I got the idea of using one of the free translation service (like this one for example), and voilà… I got my English protocol specifications (published on my GitHub).
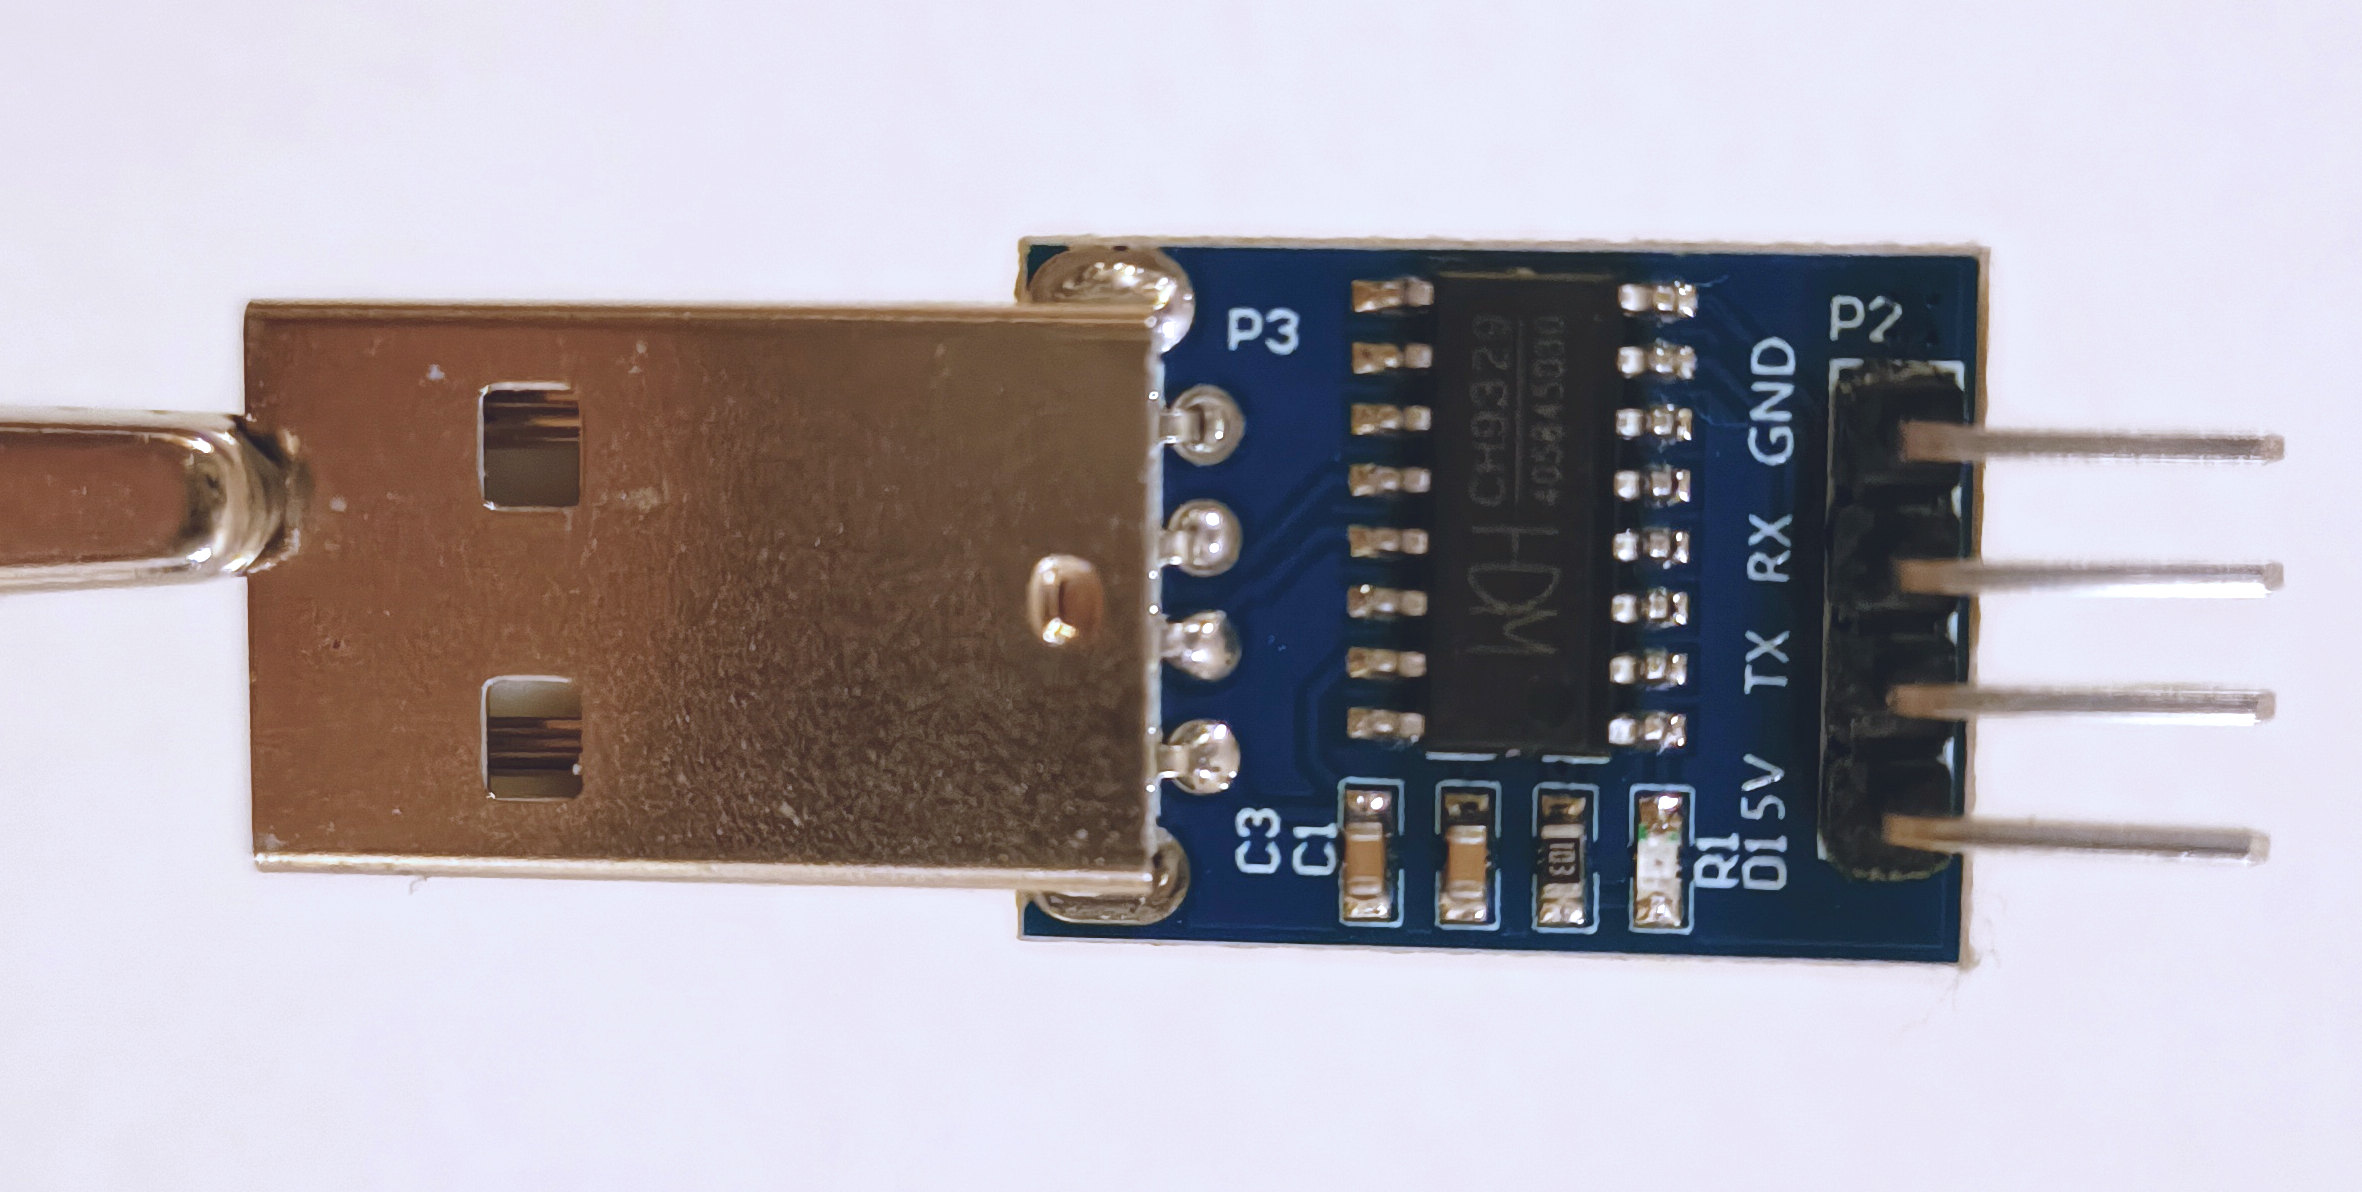
Armed with the new specs, I bought a couple of USB-to-Serial adapter on Amazon, a iron soldering kit and I started to assemble the final cable. The final cable created a Serial port on the host, which I could have sent command to, while the other side of the cable was identified by the target system as a “USB keyboard and mouse”. Perfect! 👌
After a lot of night spent in implementing the CH9329 protocol in C# and testing it, I was able to:
- Fully control the keyboard and mouse of the target device
- Re-program the CH9329 chip to operate at the full speed (by default the chip operates at 9600 bps) and to identify itself to the target machine with a customized USB descriptor.
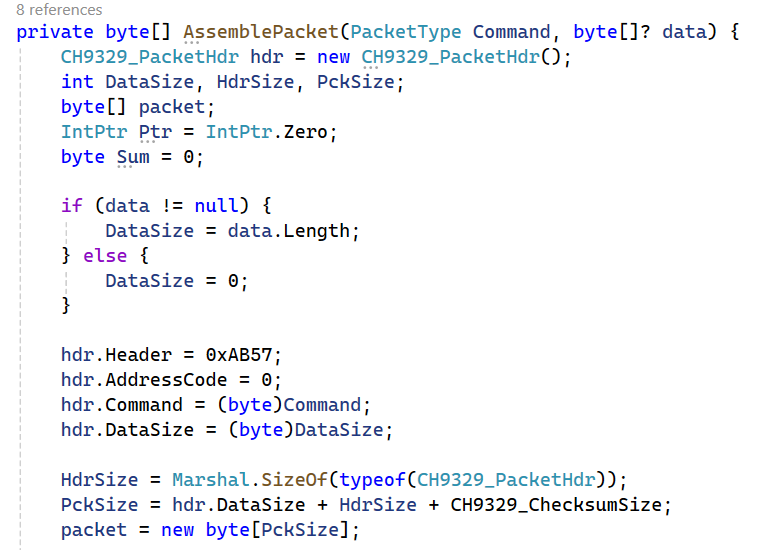
The results were great: I was fully able to move the mouse, and press keyboard keys remotely with a very fast speed (with video at 60Fps the delay is almost imperceptible, unless you play FPS video games I guess 😗). I published the entire class used to send and receive commands to the CH9329 in my GitHub MiniKvm project, here. If you are curious, here is the main routine used to assemble any CH9329 packet:
Putting everything all together: MiniKvm
Creating a fully fledged easy-to-use application was not easy at all, but it allowed me to learn “how to use” high level languages and to deal with problems that I was not aware they could exist (like the frame compression, video processing, memory leak on C# applications and so on…). The resulting application is at version 1.0, meaning that is fully stable and supports:
- Video acquisition up to 4K resolution at 60FPS (depending on the acquisition device), including full screen support and dynamic resizing
- Piloting keyboard and mouse of the target device, with synthetic multi-thread copy/paste and special commands (like CTRL+ALT+DEL)
- Power switching the target device, through a fully XML configurable “home-made” Arduino solution or others (MiniKvm includes a XML parser for the describing power switch commands, still no GPIOCXL support though 🥹)
- Support up to 16 target machines from one single host (but this limit can be raised if needed), which can also be used at the same time (depending on the host CPU speed).
- All of this by employing hardware that everyone can buy / access, that costs less than 100 USD (see the project readme file for details).
Now that I have spoken already too much, let’s see my amazing video creation skills able to assemble a 10 minutes video explaining all the details of how this work:
Note that this is one of my first YouTube video, so I do not promise anything regarding its quality 😁. If you like this project, feel free to send me a mail (info@andrea-allievi.com) or reach me on X (@aall86) for contributing to it (I am always looking for new contributors). Indeed the project needs to have the following features added:
- A fully fast and secure HTML dynamic interface, reachable on the web (removing the need to RDP to the host machine)
- Audio support
- Support for recording the target device video and audio
- Supports for the GPIOCXL driver stack, needed to access the integrated GPIO interface of certain motherboards (like the Aaeon one used for my test).
That is all for now folks! Thanks for reading. I hope that you enjoyed this post as I did in designing this thing 😊
For the next blog posts I will be back in describing low level OS problems, Windows Internals tips and tricks as before…. Stay tuned! 😉
Andrea (aka AaLl86)